springboot源码分析(04) - SpringApplication run
前言
上节讲了 SpringApplication 的构造方法,这节咱们来看下 SpringApplication 的 run 方法。
run方法
1 | |
咱们可以重点关注下一下几个点。
<1> 处,
StopWatch主要用于简单统计run启动过程的时长。<2> 处,配置
awt>java.awt.headless为true。<3> 处,调用
#getRunListeners(String[] args)方法,获得SpringApplicationRunListener数组,并启动监听。调用位置咱们在讲解 SpringApplication构造方法 中提到过,这是是读取缓存中的值Map<ClassLoader, MultiValueMap<String, String>> cache。<3.1> 处,构建了一个ApplicationStartingEvent事件,并将其发布出去,其中调用了resolveDefaultEventType方法,该方法返回了一个封装了事件的默认类型(ApplicationStartingEvent)的ResolvableType对象。
1
2
3
4
5
6
7
8
9
10
11
12
13
@Override
public void multicastEvent(final ApplicationEvent event, @Nullable ResolvableType eventType) {
ResolvableType type = (eventType != null ? eventType : resolveDefaultEventType(event));
Executor executor = getTaskExecutor();
for (ApplicationListener<?> listener : getApplicationListeners(event, type)) {
if (executor != null) {
executor.execute(() -> invokeListener(listener, event));
}
else {
invokeListener(listener, event);
}
}
}这里不得不提的就是springboot的事件机制
事件源:SpringApplication
事件:ApplicationStartingEvent
监听器:过滤后的监听器,具体5个上文中已经说过
事件环境:EventPublishingListener,提供环境支持事件,并且发布事件(starting方法)
初略的看,就是遍历getApplicationListeners(event, type),然后对每个listener进行invokeListener(listener, event)
1
2
3
4
5
6
7
8
9
10
11
12
13
14
15
16
17
18
19
20
21
22
23
24
25
26
27
28
29
30
31
32
33
34
protected Collection<ApplicationListener<?>> getApplicationListeners(
ApplicationEvent event, ResolvableType eventType) {
Object source = event.getSource();
Class<?> sourceType = (source != null ? source.getClass() : null);
ListenerCacheKey cacheKey = new ListenerCacheKey(eventType, sourceType);
// Quick check for existing entry on ConcurrentHashMap...
ListenerRetriever retriever = this.retrieverCache.get(cacheKey);
if (retriever != null) {
return retriever.getApplicationListeners();
}
if (this.beanClassLoader == null ||
(ClassUtils.isCacheSafe(event.getClass(), this.beanClassLoader) &&
(sourceType == null || ClassUtils.isCacheSafe(sourceType, this.beanClassLoader)))) {
// Fully synchronized building and caching of a ListenerRetriever
synchronized (this.retrievalMutex) {
retriever = this.retrieverCache.get(cacheKey);
if (retriever != null) {
return retriever.getApplicationListeners();
}
retriever = new ListenerRetriever(true);
Collection<ApplicationListener<?>> listeners =
retrieveApplicationListeners(eventType, sourceType, retriever);
this.retrieverCache.put(cacheKey, retriever);
return listeners;
}
}
else {
// No ListenerRetriever caching -> no synchronization necessary
return retrieveApplicationListeners(eventType, sourceType, null);
}
}从上图可知,主要涉及到3个点:缓存retrieverCache、retrieveApplicationListeners已经retrieveApplicationListeners中调用的supportsEvent方法。流程是这样的:
1、缓存中是否有匹配的结果,有则返回
2、若缓存中没有匹配的结果,则从this.defaultRetriever.applicationListeners中过滤,这个this表示的EventPublishingRunListener对象的属性initialMulticaster(也就是SimpleApplicationEventMulticaster对象,而defaultRetriever.applicationListeners的值也是在EventPublishingRunListener构造方法中初始化的)
3、过滤过程,遍历defaultRetriever.applicationListeners集合,从中找出ApplicationStartingEvent匹配的listener,具体的匹配规则需要看各个listener的supportsEventType方法(有两个重载的方法)
4、将过滤的结果缓存到retrieverCache
5、将过滤出的结果返回回去
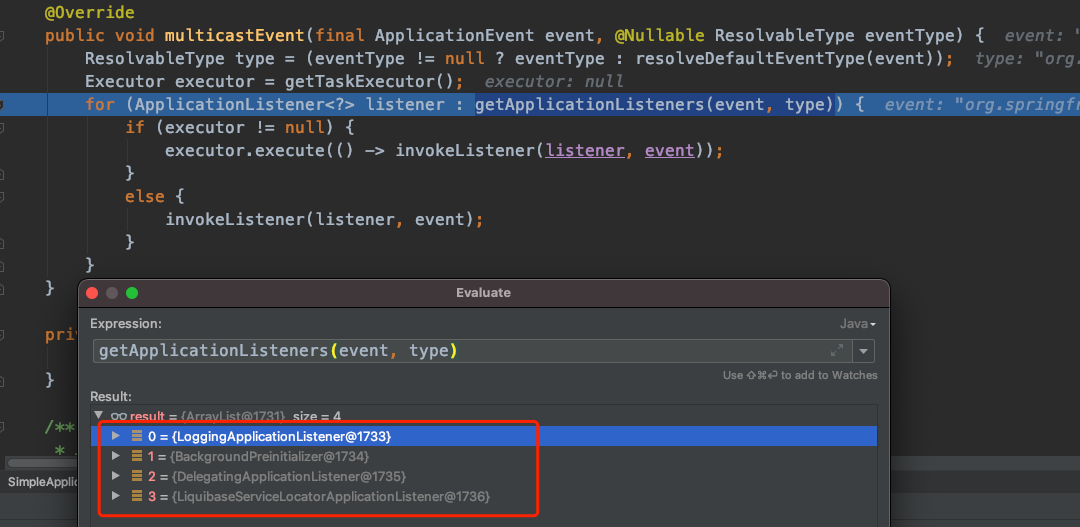
过滤出的listener对象有哪些:

invokeListener
使用给定的事件调用给定的监听器
getApplicationListeners方法过滤出的监听器都会被调用,过滤出来的监听器包括LoggingApplicationListener、BackgroundPreinitializer、DelegatingApplicationListener、LiquibaseServiceLocatorApplicationListener、EnableEncryptablePropertiesBeanFactoryPostProcessor五种类型的对象。这五个对象的onApplicationEvent都会被调用。
那么这五个监听器的onApplicationEvent都做了些什么了
LoggingApplicationListener:检测正在使用的日志系统,默认是logback,支持3种,优先级从高到低:logback > log4j > javalog。此时日志系统还没有初始化
BackgroundPreinitializer:另起一个线程实例化Initializer并调用其run方法,包括验证器、消息转换器等等
DelegatingApplicationListener:此时什么也没做
LiquibaseServiceLocatorApplicationListener:此时什么也没做
EnableEncryptablePropertiesBeanFactoryPostProcessor:此时仅仅打印了一句日志,其他什么也没做
<4> 处,创建
DefaultApplicationArguments<5> 处,调用
#prepareEnvironment(SpringApplicationRunListeners listeners, ApplicationArguments applicationArguments)方法,加载属性配置。执行完成后,所有的 environment 的属性都会加载进来,包括application.properties和外部的属性配置。<6> 处,调用
#printBanner(ConfigurableEnvironment environment)方法,打印 Spring Banner 。<7> 处,调用
#createApplicationContext()方法,创建 Spring 容器。请看代码:
1 | |
根据SpringApplication的webApplicationType来实例化对应的上下文;如果webApplicationType的值是SERVLET,那么实例化AnnotationConfigServletWebServerApplicationContext,如果是REACTIVE则实例化AnnotationConfigReactiveWebServerApplicationContext(响应式编程,后续再看),如果既不是SERVLET、也不是REACTIVE,那么则是默认情况(也就是我们所说的非web引用),实例化AnnotationConfigApplicationContext。很显然我们目前的应用类型是SERVLET,那么实例化AnnotationConfigServletWebServerApplicationContext。
<8> 处,…
<9> 处,
#prepareContext(ConfigurableApplicationContext context, ConfigurableEnvironment environment, SpringApplicationRunListeners listeners, ApplicationArguments applicationArguments, Banner printedBanner)方法,准备 ApplicationContext 对象,主要是初始化它的一些属性。
1 | |
本博客所有文章除特别声明外,均采用 CC BY-SA 4.0 协议 ,转载请注明出处!